A one-shot is an interesting and invaluable programming tool. At first glance it might be difficult to figure out why such an instruction is needed. After we understand what this instruction does and how to use it, however, the necessity will become clear.
A one-shot is used to make something happen for ONLY 1 SCAN. (you do remember what a scan is, right??) Most manufacturers have one-shots that react to an off to on transition and a different type that reacts to an on to off transition. Some names for the instructions could be difu/difd (differentiate up/down), sotu/sotd (single output up/down), osr (one-shot rising) and others. They all, however, end up with the same result regardless of the name.
 |
| One-shot Instruction |
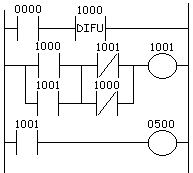
Let's now setup an application to see how this instruction actually functions in a ladder. This instruction is most often used with some of the advanced instructions where we do some things that MUST happen only once. However, since we haven't gotten that far yet, let's set up a flip/flop circuit. In simple terms, a flip/flop turns something around each time an action happens. Here we'll use a single pushbutton switch. The first time the operator pushes it we want an output to turn on. It will remain "latched" on until the next time the operator pushes the button. When he does, the output turns off.
 |
| Here's the ladder diagram that does just that |
- Rung 1-When NO (normally open) input 0000 becomes true DIFU 1000 becomes true.
- Rung 2- NO 1000 is true, NO 1001 remains false, NC 1001 remains true, NC 1000 turns false. Since we have a true path, (NO 1000 & NC 1001) OUT 1001 becomes true.
- Rung 3- NO 1001 is true therefore OUT 500 turns true.
- Rung 1- NO 0000 remains true. DIFU 1000 now becomes false. This is because the DIFU instruction is only true for one scan. (i.e. the rising edge of the logic before it on the rung)
- Rung 2- NO 1000 is false, NO 1001 remains true, NC 1001 is false, NC 1000 turns true. Since we STILL have a true path, (NO 1001 & NC 1000) OUT 1001 remains true.
- Rung 3- NO 1001 is true therefore OUT 500 remains true.
- Rung 1-When NO (normally open) input 0000 becomes true DIFU 1000 becomes true.
- Rung 2- NO 1000 is true, NO 1001 remains true, NC 1001 becomes false, NC 1000 also becomes false. Since we no longer have a true path, OUT 1001 becomes false.
- Rung 3- NO 1001 is false therefore OUT 500 becomes false.
If after viewing the animation you still find it difficult to understand, don't feel bad. You're just an idiot and should give up!!! No not really. Just try to remember how its scanned by the plc. Think it through one instruction at a time from top to bottom, then left to right. (i.e. in this order: NO 0000, difu 1000, NO 1000, NO 1001, NC 1001, NC 1000, OUT 1001, NO 1001, OUT 500) While executing each instruction is it true or false?
Rung 2(it has 5 instructions) is the confusing part for most of us. To make it easier lets break it into sections. NO 1000 and NO 1001 are in parallel. In other words they form an "or" circuit. Call this section 1. If 1000 OR 1001 is true then this mini section is true. Next we have another section in parallel. This section is NC 1001 and NC 1000. Again these 2 are in parallel. Call this section 2. If NC 1001 OR NC 1000 is true then this section is true. Finally, those 2 parallel sections(sections 1 and 2) are in series with each other. This means that if section 1 AND section 2 are BOTH true then the rung is true and output 1001 must be true.
Now its much easier to understand, isn't it? We also just learned about OR and AND logic, commonly called parallel and series logic.


0 comments:
Post a Comment